Tuesday, August 14, 2012

Finally the Right Step

One of the biggest pet peeves about this house when we moved in were the soggy, worn down carpeted stairs...for those of you who saw the before pics of my house, you may remember these:
That picture almost makes them look good. In reality the carpet is sagging off the front, and they are dirty and gross. Trust me. And creaky as well! It is no wonder when the underneath looks like this:

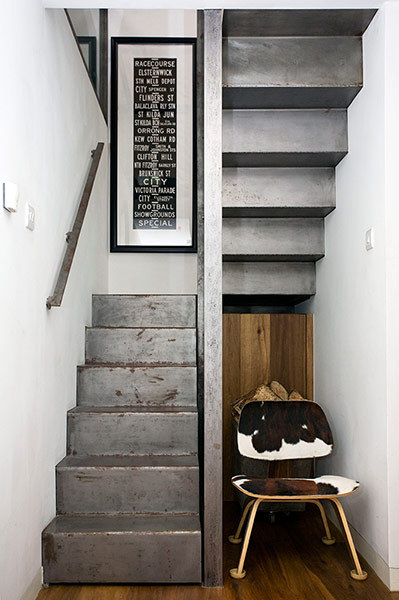
 We were pretty sad to see that they were the original stairs underneath. The ideal circumstance would be to restore the old stairs to maintain character, but most of them are split right in half! (hence the sagging). We found a deal a while back on a tread and riser kit that covers existing stairs instead of taking them off and replacing them. I don't have any beautiful after pictures of them yet, but I can instead leave you with some pretty pictures of creative and beautiful staircases that keep me motivated for the finished product!


I think I may have a new obsession!

Monday, August 13, 2012

Carradice Bike Bureau Review


I've now had the Carradice Bike Bureau for a while and thought it was about time for a review. Overall I think it's a great bag which hits the mark for my uses.

I was basically looking for a pannier that would function well off the bike as a shoulder bag, plus look good. I also needed it to hold a fair bit of stuff.

Mine is actually a second from the factory store in England (a friend brought it back for me - thanks Graham!) so it doesn't have the laptop sleeve, but I was intending to use my own anyway.

Firstly, the looks:


Off the bike, you peel back the uppermost flap (which then covers the hardware) and it reveals a pretty classic looking satchel. The Leather straps are yellow-y and great quality. What's really nice is that they are decorative - you use clip-locks to do the actual closing - much easier! I wish the nylon shoulder strap had a leather pad on it, but it looks fine.


Under the main flap there is this zipper pocket, plus a pocket right behind it, presumably for a U lock as it fits mine well. It does, however, depend on how much you put in the zippered compartment. If you've loaded it up with your Constanza-wallet, keys and phone, then your lock won't fit in. This brings us onto the size.


It's humongous. Deceivingly so. It's very hard to capture, but here is a helmet in the bag. I could easily stash four big helmets in here with no worries. There is a drawstring thingy at the top of the satchel which also means you can overstuff. The leather straps on the flap can be adjusted to assist the overstuffing.

The fabric is very stiff waxed canvas and all of the thinner nylon parts have some sort of waterproofing applied to them. It all seems very sturdy.


Here's the hardware. Note that it is on an angle to avoid heel-strike. It's a big, big pannier and I have big feet. I've never hit it with my heel. Each bag is side-specific, so if you're buying a pair, be aware (I'm a poet). The system of attachments is very simple to use. I don't know if I'm doing it 'correctly' but it works fine and fast. There's probably some way to do it with one hand in a single movement but I haven't quite figured that one out yet!

Overall, this is a really great pannier. It's huge and would be great for work, school, shopping etc. It's a bit of a behemoth to carry as a bag, but it's a big bag. It holds a lot of stuff. I totally recommend getting one!

Friday, August 10, 2012

Covet: Arches

Before we moved into this house, we lived in a rented duplex that was a Victorian farmhouse. It was really nothing special inside, but my renovation-crazy mind dreamed of fixing it up to highlight some of the original features that were still left; specifically the arches in the hallways. To this day, arches are on the top of my list of coveted architectural features in a home:


Aren't they fabulous? Unfortunately I am beginning to think that this design feature is hard to find in my neighborhood, but so are houses these days (nothing to feed my MLS/house-stalking hobby!). What feature of a home could you not live without?

Thursday, August 9, 2012

Three Cheese Mac


If one cheese is good, then three are better, right? I'd say so. I made this super-cheesy Mac and Cheese the other night and it was a bit of a hit. Most of the cheesiness will come from cheddar and we'll also use some parmesan for bite and Jarlsberg for yumminess.

Here's how you too can be the hero of the day:

Put a big pot of water on to boil for the pasta. Throw in a pound (a whole box) of pasta. I used rotini. Now start on your cheese sauce.

  • 4 Tbs butter
  • 4 Tbs flour
  • 3-ish cups of milk
  • Dry mustard
  • 1 lb cheddar, grated. It's a lot, I know.
  • 1/4 c parmesan cheese (freshly grated)
  • 1/4 c Jarlsberg/swiss cheese, grated
Melt the butter and add the flour. Cook this out, stirring, for a few mins. Don't let it colour. Now you should heat your milk but I live dangerously and throw about half the milk in and then whisk like a crazy person. Whisk all those lumps out. Then add teh rest of the milk and keep on whisking. Stir it constantly until it's nice and thick. It can simmer, but not boil. Add a really good shake (1 tsp) of mustard powder and all of your cheeses. Set this baby aside while the pasta cooks. Scoop some of the pasta water out and set it aside in case you need to thin the sauce. Drain the pasta and then mix the sauce through. If the sauce is crazily thick, add some of the water. You probably won't have to. Now put some in a dish (I used this adorable vintage skillet) and set it under the broiler for a few mins to brown the top. Mmmm.

Wednesday, August 8, 2012

Trendspotting: Houses


Have you noticed this? Could it be that houses are the new owls? I think they are less cutesy and have more staying power, don't you? I am a fan!

Tuesday, August 7, 2012

Queso Fundido with Chorizo


Hmmm....a melting, bubbling vat of melty, browned cheese served on homemade tortillas? Yes please!

I saw this on a TV show and knew this had to be made. Immediately.

First, I made a batch of my homemade chorizo. I cooked it up and put it in the bottom of this baking dish. Then I grated a pound, yep a pound, of mozzarella and put it on top. It should probably be some sort of special Mexican cheese, but it's a nice bland accompaniment to the chorizo.

I then baked it at 400F for about 25 mins, until it was bubbly and brown. I served it with some homemade tortillas and Tomatillo-Cilantro Salsa.

Friday, August 3, 2012

Tomatillo-Cilantro Salsa


Tomatillos. Wow. How did I live so long without them?

They had some gorgeous ones at the farmer's market this week so I decided to whip up this yummy salsa. It's pretty saucy so it's definitely for use as a sauce for tacos etc than for chip-dipping.

  • 1/2 a sweet onion (I used Mayan Gold. Vidalia would also be ok)
  • 1 Quart Tomatillos, de-husked
  • 2 cloves garlic
  • 1/2 bunch cilantro
  • juice of half a lime
  • 1+ green chilli peppers. Jalapeno would be nice, but I only had a big green one from the garden (plus I didn't want it too hot for the kiddoes)
  • salt
Plonk everything into a food processor and whizz up until everything is smooth. Chill. That's it. yep.