You can see a lot of these projects involve the kids, an essential because they are all around 24/7 these days! How has your summer been going? Are you feeling creative?
Showing posts with label DIY. Show all posts
Tuesday, July 31, 2012
Summer DIY Inspiration; Episode 2
I still have DIY on the brain, and now that summer heat is here I can take some projects outdoors! Here are the new projects I would love to get my hands on...
Thursday, June 14, 2012
Pea Gravel In!
We did it! decided to go with pea gravel. After doing the calculations, a small patio to the side of the deck in paving stone would have cost approximately 400 dollars. Yikes! If you have a kind friend with a truck, that same area cost about 40 dollars cash at a local aggregate place (plus a husband complaining of a sore back for 4 days). We are pretty excited with how it turned out so far!
We decided to put stone edging to contain the gravel, which cost about 26 dollars. Now hopefully the weather stays nice this weekend so we can keep working on our little yard (next step, sod, stain deck, and paint!)
Tuesday, June 12, 2012
Fun with Chip It!
Maybe I'm amused easily, but I've been having a lot of fun turning pictures into paint palates with Chip It!, the new app by Sherwin Williams. See, I'm someone who loves design, but in application I get really stuck when it comes to paint colours because I gravitate towards all things grey and white (the overly cautious paint picker). Are you the same? Check out some of the palates I made using some of my favourite pictures...
Images found here (1./2./3./4./5./6.). And you can find the app Here.
Have fun!!
Images found here (1./2./3./4./5./6.). And you can find the app Here.
Have fun!!
Wednesday, June 6, 2012
DIYs I'd Like to Try This Summer
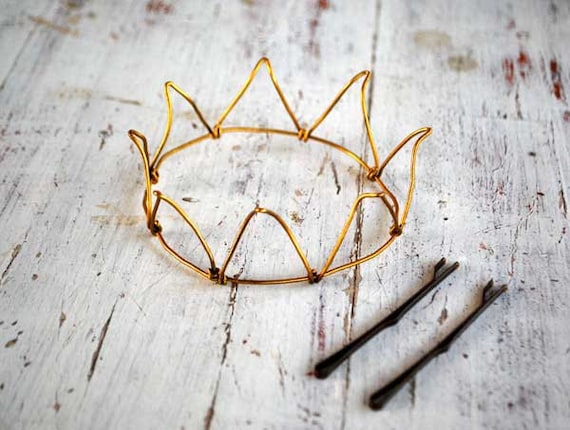
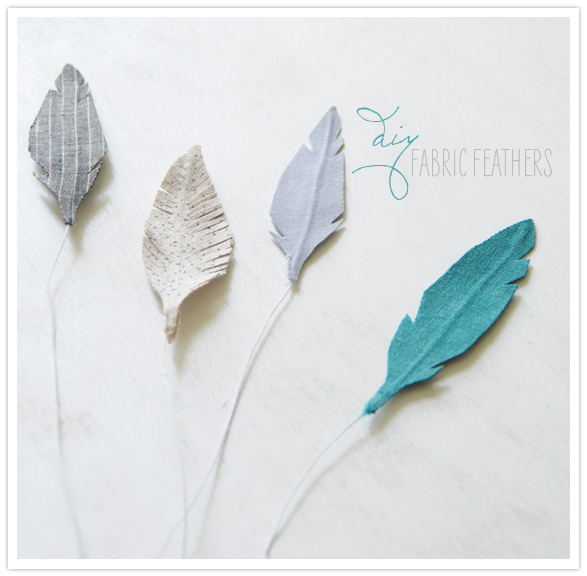
Ever since Holly saw her auntie wearing one in her hair, she has wanted a feather of her own. I like that I could customize the colours for her barrettes with these, found at 100 layer cake.
I don't know why I never thought of using Henry's old blocks for cool hooks. And dip-dyed? count me in. Via here.
These fun little planters found on Bambula would look great on my new horizontal fence, don't you think?
This adorable little cloud magnet found at Casa e trend makes me want to bust out the ol' Fimo again! (I loved that stuff as a kid!)
I could see these sweet clay pots sitting on my kitchen window...
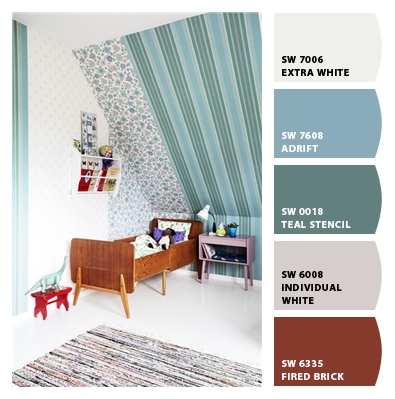
Finally, these fabric flower garlands are just perfect for Holly's (and Hazel's!) room, don't you think? I feel like all these DIYs are achievable on a weekend, feel like tackling one with me?
Monday, June 4, 2012
The Boring Part of Home Improvement
Not much going on around here this weekend except for this:
So much fun. Ha! When we moved the fence, we were left with a path that went nowhere. After pricing out paving stones (did you know that they are more expensive per square foot than hardwood?!), we decided to dig out that nowhere path and use the rocks to create a new path/lower patio area near the new gate that would be wide enough to accommodate the BBQ and a walking area. On the other side of the deck, there will be a paved (brick, I think) area which will be another lounge area (although for now it will host the little hideous playhouse and sandbox which I do not have the heart to get rid of yet- they will be moved before sale). And while I have not convinced my husband to paint all the siding, we do need to paint the cement board that surrounds where the new windows were placed in the kitchen. I picked this grey, which works with that gross red-ish colour of the siding. Hope it draws the eye in and distracts...
It's called Iron Ore by Sherwin Williams. Well, better go take advantage of the sunshine! Hope you guys had a wonderful weekend...
Labels:
backyard. before and after,
DIY,
landscaping,
paint,
patio,
stones
Wednesday, May 23, 2012
tarantula
Remember this ugly table, on my to-do list a year ago?
It was this ugly, marble-y green, but I was in love with the shape. Well it was nice enough this weekend to spraypaint it, so paint we did!
Love the matte look! Now I can't stop thinking about painting my floors white....
It was this ugly, marble-y green, but I was in love with the shape. Well it was nice enough this weekend to spraypaint it, so paint we did!
Love the matte look! Now I can't stop thinking about painting my floors white....
Labels:
before and after,
DIY,
furniture makeover,
spraypaint
Thursday, May 17, 2012
More Fence Progress
When we first started building the fence, we thought we would just close up the one side that was open and dangerous and that would be the end of it. Well, big surprise, the old fence on the other side looked pretty crappy next to our new horizontal fence on the other side:
Pretty ugly, plus a lot of wasted (precious) space, with that weird zig zag. Well I had my doubts at first, but my husband had this idea that if he sold the pre-fab panels on the internet, he would earn enough for the materials for the other side, if we re-used fence posts. Well, what do ya know, it worked!
The fence still needs trim and finishing, and the yard some serious landscaping, but we gained tons of extra square feet so the backyard seems huge compared to what it was before. I can't wait to get it finished, but we are already enjoying lots of time in our new, private space!
Thursday, May 3, 2012
Dipped
Oh please, please don't let this trend be over when I just had the urge to dip everything I own in paint this weekend. Are you on board?
Tuesday, May 1, 2012
Fence Progress!
If you were wondering why I've been obsessing over backyard spaces lately, it's because over the winter months my backyard has looked like this:
Err...kind of embarrassing. You see, when we moved in, there was a fence up. Then, the church tore it down. And told us they did not have to rebuild legally, only if they wanted to for moral reasons. *Ahem*. Whatever, we won't get into that. I'm sure whatever they built would not be as fabulous as my soon-to-be-fabulous fence!
Woohoo! Of course, don't mind the pool o'crap, and the swing set. Henry agreed to let it go in place of a sleek motorcycle tire swing spray painted a la Novograts. Anyone else seen that episode? There is still some trimming to do on the top, strapping on the back (and a few more panels to be built). I have yet to decide whether I want to trim each individual panel down the seam or leave it flat and exposed. Also, to stain or not to stain? What's your opinion?
Tuesday, April 17, 2012
Before and After: Holly's Colorblocked Curio Cabinet
Holly is a huge fan of ponies, so this year at Christmas my parents bought her the fuzzy pony set by Melissa and Doug. It came in this barn shaped wooden packaging that was kind of neat, but Holly in her panic to get the ponies out, ripped out some of the paper scenery.
I thought the shape of the packaging was pretty cool, and the fact that it was wood made it hard to throw out, it seemed like such a waste! So yesterday afternoon I got out some old paint colors from previous projects and worked away at it. What resulted was a cute little display case to place some of those funny little trinkets toddlers like to collect...
My intention is to hang it on the wall for her to rearrange her trinkets herself but I haven't quite figured out where. It was looking great against the walls of my dining room and is making me wish I could re-paint Holly's room! What do you think?
Labels:
before and after,
book storage,
chalkboard paint,
color block,
DIY,
recycle,
repurposing
Tuesday, March 6, 2012
Happy Blog-iversary!
It's hard to believe Leila and I have been working on this little ol' blog for a whole year! It's been an exciting and productive year for the both of us. Let's take a moment to recapture all of the fun moments of the year:
We started off the year with a bang with Leila's popular book sling hack;
We celebrated with Holly's tea party and Emmett's fabulous moustache party!
I showed you the before and after of Henry and Holly's playroom, also featured on Ohdeedoh; where you can find the DIY play kitchen Santa made for her:
There was lots of thrifting...
and yummy cooking...
some furniture makeovers...
And as always, reno updates!
Thanks to all our friends who read this blog regularly, we love you all. There is still so much to share with you, so we hope you tune in as we continue our blogging adventure!
Labels:
bathroom reno,
children's party ideas,
DIY,
play kitchen,
playroom,
thrifting
Subscribe to:
Posts (Atom)