Wednesday, August 31, 2011

The Bumpy Road in Renovations

Remember the deal on a vanity that I mentioned a while back?

I scored a vanity from IKEA at an unbelievable price. Well, turns out that deals are not always what they seem, and I have learned another renovation tip: talk to your contractor or handyman in detail before making purchases. Turns out all sorts of complications come with floating vanities in old houses: moving plumbing, creating access panels, tearing out walls...all of a sudden the deal of a century does not become so deal-like. So back to the drawing board. 
Turns out vanities are expensive. And I hate most of the ones you can buy out there. This is where I turn to the internet to help me find an alternative, to see if something can be done to magically make the vanity of my dreams:
I think most of us have seen this piece of kitchen furniture at IKEA some time or another. Other than the open shelving (I don't want to see the pipes), I think it is a little piece of genius. 
Same idea with IKEA effectiv office furniture.

These people used one of the bathroom cabinets from Ikea that I do not like, Lillangen (I thought it looked kind of cheap at the store). I really like it here though, the customized fronts and handles make it look less Ikea-like.
Another person who customizes furniture to use as bathroom cabinets is Sarah Richardson. Here are a few of her gorgeous transformations:

This cabinet was from pier 1!

This is not a cabinet, but a was originally a rusted out iron table she transformed.
Another beautiful transformation, she lucked out by finding a sideboard with a marble top for $350...I wonder if I could be so lucky.....
There is also the option of making one or getting one custom made, which sounds expensive too. You also have to somehow protect the top surface of the furniture which could pose a challenge and add to expense. Does anyone have any other ideas to share? Have you re-purposed any furniture for a kitchen or bath?

Tuesday, August 30, 2011

Grilled Summer Vegetables


I love grilled veggies. We had some enormous zucchini from the garden this week as well as some lovely Lebanese Eggplant (the finger shaped ones) and some local Bell Peppers, so I decided to grill them simply.

I split the egglants lengthwise and sliced the zucchini lengthwise (about 1/2 inch thick) and then dipped them into a shallow dish with some olive oil in the bottom. I them placed them on a hot BBQ/grill, seasoning them with salt and pepper. When they were sufficiently brown and soft, I flipped them to cook them through, taking them off when done the same amount on the other side.

For the peppers, I just washed them and put the directly on the hottest part of the grill. As soon as they charred on one facet, I turned them slightly until they were black all over. Then I did the stem end and the bottom. The secret for easy peeling is to put them into a sealed plastic bag until they are cool enough to handle (10 mins?) and then the thin, black skin should easily rub off. You can just rinse any extra bits off under the tap, but a few black bits are actually quite nice. Then cut out the seeds and chop roughly.

I then chopped the other veg roughly and tossed them with a bit of balsamic vinegar and added a bit more salt and pepper. I also had a bit of goat's cheese int he fridge so I forked that on top. I didn't think of it at the time, but some chopped chives from the garden would perfect this dish!

Monday, August 29, 2011

Daytripping...

Sorry I'm a little bit late posting today, enjoying some sleep after a wonderful birthday weekend with my family at my grandparent's house near Orillia, Ontario. Some great house tours I enjoyed this week here and here. But don't spend too much time inside! summer is nearing an end and I intend on savoring it...until tomorrow, here are some scenes from the weekend....


I hope you enjoyed your weekends, friends!

Friday, August 26, 2011

New House Numbers!

 Before...

...and AFTER! 
(ignore the big hole near the shutter)
Rachel posted about buying our numbers from Re-Store here and I finally hung them on the weekend! We'd been suffering with the old ones for way too long. Here is how I did it. I'm sure it seems obvious to the more handy, but for me it was a first time.

First I pried the old numbers off with a hammer

Next, I taped the guides to the wall, trying to get as many of the drill holes in the mortar. I then used a screw and a hammer to punch through the paper to mark the hole placement. Then, using the worst drill in the world, I drilled 1/8 inch holes using a masonry bit, and then re-drilled using 1/4 inch.

Then, the instructions said to fill the holes with caulking and push the numbers in, holding them in place with tape:


  And here is the result. If you look closely, you'll see that the caulking is visible. I'm going to trim it back as far as I can with a craft knife and if that doesn't help, I might try pulling them out and using a clear or darker coloured caulking. Or I could try using a Sharpie to colour it in....


Thursday, August 25, 2011

Back to School

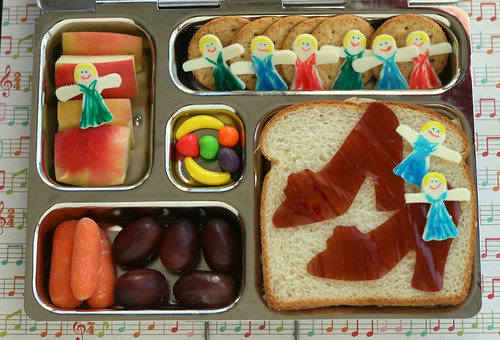
Even as a kid, I loved this time of year. Yes, it means the end of summer but it also means new beginnings, new friends, school supplies, classrooms and even new resolutions for schoolwork. I guess that is why I find it so fun to be on the other end and have a kid going to school, because I get to shop for the stuff! Today's lunches are a challenging issue for most parents; with balanced school days gone are the long lunch and two recesses; the focus is more on bite sized snacks throughout the day. Top this with a "litter free" and "peanut free" policy and parents may be at a loss. Because my son is naturally a "snacker" and also has a nut allergy, I would like to share some resources for making normal lunches beautiful and fun.
First of all the containers: This year I will be taking a bento-style approach to  lunches. This takes care of the garbage issue and eliminates the eventual "smell" these insulated lunch boxes acquire a month into school:
These are the top on my list. Now I'm not going to claim I know anything about filling these things, although I will share my adventures this year. I do know how to find peanut free snacks though, and I will be using these sites as inspiration:
These women create lunches that are works of art for their children. Not everything is peanut free but they have some great ideas for holidays, themes, and lots of resources for products to make the lunches fun!
Some additional resources for inspiration! What about you guys? any special ideas for back to school, or places to buy cool boxes for kids? please share!


Wednesday, August 24, 2011

Freeform Gingerbread Men


Who doesn't love kids' drawings? When I was a kid my Mum and I would make these freeform Gingerbread Men that look just like a cookie version of a drawing! Incidentally, in Australia we do ginger-related baking all year round, not just at Christmas. So today Eleanor and I decided to give it a go. Here's how:


  • 3 cups all purpose flour
  • 1 teaspoon baking powder
  • 2 teaspoons ground ginger
  • 1 teaspoon ground cinnamon
  • 1/2 teaspoon nutmeg
  • 1/2 teaspoon salt
  • 1 stick (125g) butter
  • 3/4 cup packed light brown sugar
  • 1 large eggs
  • 1/2 cup dark molasses
Preheat the oven to 350 degrees F. Sift dry ingredients together. Melt butter and molasses together then add to dry ingredients along with the egg. Mix with a wooden spoon and then get your hands in there to finish off. You might need to adjust the consistency by adding more flour or a little milk. it should be the consistency of play dough.

Now, depending on the age of you kid/s you can help them make the men. Eleanor is 2.5 so I broke off the pieces of each body part (head, body, arms, legs) and told her to roll them into balls or sausages. She then joined them together by pressing them onto the lined cookie sheet. We then used some raisins for eyes. You can use other dried fruits for buttons and other details if you like.

Bake them for about 10-11 mins, depending on what thick they are. When they start to get darker brown around the edges, they are ready.

And then eat. Mmmmmm.

Tuesday, August 23, 2011

Sometimes Ideas Just Need to be Shared...

This idea has been circulating on blogland for quite a while: I first saw it on Ikea Hackers, and then one of my favorites Table Tonic:
Now I know, I've been a little crazy on the storage lately. But what kind of friend would I be if I didn't share this brilliant idea? These run for only 6.99 at Ikea; I could go buy a million of these, they hold so much. I could see them especially in a craft room, and my husband is definitely going to pick up a few for his shop. Now here is how they look in Holly's room next to her own little stuva bench (I had to pick that girl up some storage, her room is next on my list. It is sad to say but her space has been poorly neglected this summer):
I like the look of these painted white but I am enjoying the natural colour as well. What do you think?

Monday, August 22, 2011

How to get a Shiny Sink Without the Nasties


For a while I was really into the FlyLady. She's an online guru for de-cluttering and it was really great for us when we were trying to lose our slovenly ways. Her big thing is to shine your sink before you go to bed so that you wake up with it all beautiful. It's a really nice thing to do and got us into the habit of making sure the kitchen was really spotless after dinner.

However, her method involves lots of chemicals - bleach, Ajax etc. Here's how I do it using safer products. Warning - this is not going to be a pretty post! My sink's pretty old and (was) crusty and if I can get near-new looking results on it then yours will be amazing if it's newer.


First, dump a pile of Baking Soda (Bicarbonate of Soda) and/or salt in there. I prefer plain baking soda, but I was almost out that day so it's a mix.Then add a good squirt of whatever dishsoap you use. I use some hippy-dippy stuff (7th Generation normally) but Dawn or whatever you use is fine. Please note how disgusting my sink was, pre cleaning.

 Now get a scrubbie and scrub away. Because you're not using anything harsh you don't even need gloves! Woot! Make sure you get around the taps. Then rise it away and dry! Drying it is the most important step.

If you want to go one step further into insanity, you can use some Windex on it to really shine it, but I don't do it (and didn't for these pics). Then feel totally Martha Stewart.

Friday, August 19, 2011

Stuva Review

Well, Henry's storage is finally built (which did not take that long but probably a little longer than expected). We guess that most people would find this moderately difficult to build but IKEA amateurs might take a little while. Here is the combination we chose (undecorated, sorry):

It worked out perfectly because we chose units that would fit on two different walls just in case we didn't like the result: it turns out that because of the bench height the unit can extend under the window and fit along the wall with his dresser, to maximize floor space.
The bench units make perfect window seats, and are the same height as my dining chairs which could make them pretty useful in a kitchen. Although IKEA shows children standing on them as a stage in the catalog,  they did show a little give when this big pregnant lady tried to sit on one, so I would reinforce it to use it for adults.
As far as quality is concerned, they are built well and easy to clean. Unlike Henry's last IKEA wardrobe that could barely withstand a move and waved in the wind;

the sturdy, thick frames of the stuva look like they will last (the height helps. too). The finish makes it nice and wipeable for grubby little hands. Our only complaint is that the door slams, but my husband was quick to point out that you could use a quiet close kitchen hinge that they provide with IKEA kitchens to omit this problem.

The stuva is nice and kid friendly, as my kids played with it last night like a jungle gym. You can see the drawers are HUGE:

Yes, you can fit a Holly (or three!) in there. They tried. The height of the wardrobe is at perfect eye level with my tall almost-seven year old, and reachable height for my two year old.
What do you think? I am so tempted to sew a nice seat cushion for the bench part to make it cozy but one of the benefits of this unit is that the benches are at a height that they make a nice play surface. So far, the stuva gets my (and four other little) thumbs up!


Thursday, August 18, 2011

Strider Balance Bike Review


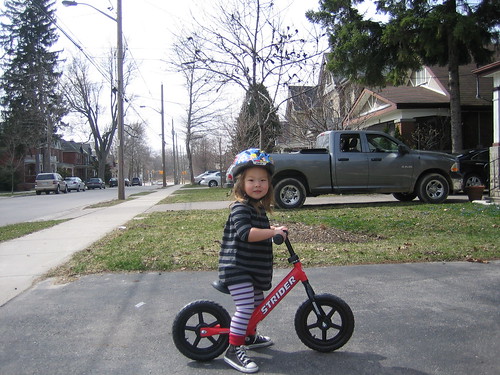
Balance Bikes are pretty common at the moment and are designed to help toddlers learn to balance on a bike without the complications of pedals. If you believe the hype, your kid will be a bike-riding prodigy and will be riding a two-wheeler without training wheels before their trike-riding peers. There are several types available and quite a few are adorable and wooden (Skuut, for example). We decided to get a Strider because it seemed stronger and more bike-like.

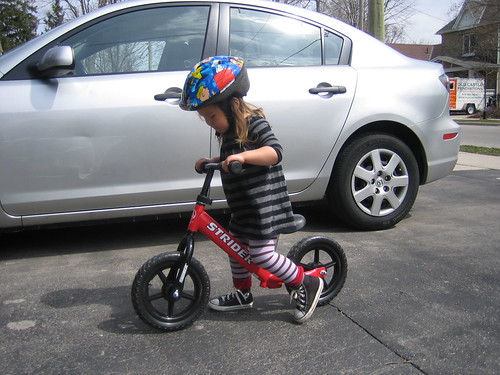
As you can see from this photo, we've had the Strider Bike since the spring. When we first bought it, Eleanor was about 2.5 years old. Initially, she just walked on it very slowly and it kept falling over. Now, several months later, she has progressed to walking fast and sometimes slow running. She also sometimes tries to lift her feet, but she doesn't quite have enough speed to balance well.

The bike itself is very sturdy (I have heard that some of the wooden ones tend to break, especially the handlebars). It's welded joints are neat and strong. The tires are foam filled so won't go flat. There are fake valves for the look factor. When we bought the bike, the headset was adjusted quite tightly - I suppose this prevents your toddler from becoming frustrated as the handlebar sharply turned.

It comes is quite a few colours - pink, red, green, blue and orange. Naturally, we chose red because it goes the fastest. The paint does scratch somewhat (the bike does spend a fair amount of time on the ground), but doesn't seem to chip easily. It's definitely made to last and will be passed down to Emmett and other kids.

Overall, I am extremely pleased with the Strider and always recommend it. I will be quite curious to see if it makes training wheels redundant.

Have you had any experience with these, post-toddler?

(Excuse the dents on my car!)

Wednesday, August 17, 2011

IKEA trip

Whenever I'm craving home solutions, an IKEA trip is always in order. Or at least that's what I felt this weekend! We did a small trip (our closest one is an hour away) and I came back with quite a bit of loot!
The majority of the pile is Henry's new storage solution. A little more than what I would have liked to spend, but I justified it by a bathroom score:

My vanity was marked down to $64 from over 300 (I will let you guess which one)! Check your local store's offers before going...
Of course I had to pick up some things for future projects (I've been eying this fabric for a while, soon to be discontinued I guess):
Of course there were things I wished had come home with me, as always:

Holly spotted these adorable trays, perfect for a little colour in the kitchen!
These rugs have been on my radar for a while (the one peeking out on the right would be perfect for my living room!)
I could have taken ALL these lamps home with me (you know my lamp obsession!) Oh well, maybe next time! Stay  tuned for the results of the trip!

Tuesday, August 16, 2011

To theme or not to theme?


Themed kids' parties are so cool. I loved having Emmett's mustache party at home. Eleanor will be turning 3 (!) in October so I am starting to think about parties.


I think we will make this one fairly small and limit it to kids that Eleanor plays with regularly, as I feel the 3rd birthdays begin to be about the kids rather than the parents (did I say that, LOL?).

We've loved attending everyone's parties so far and each was so different. Holly's was uber-stylish and cute, of course and we have also been to non-themed house parties and one at the Little Gym. Eleanor loved them all. So what should we do?

Eleanor's turning out to be a pretty girly-girl and went crazy over the fairy dress her Nana and Pop brought from Australia. So I think some sort of girly theme is definitely in order, however I don't know if we will be inviting any boys. So I'll have to put some thought into it.

Here are some ideas I'm loving:

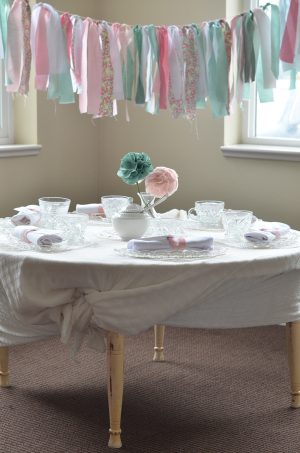
In the Hushed Hours Via The Sweetest Occasion
LOVE the antique-colours and garland! This party is to die for!

The Sweetest Occasion
 Um, what is there not to love about individual hats in bright colours?

Martha Stewart
Is this not the most gorgeous girly cake you've ever seen?

Do you have a big birthday bash for each of your kids' birthdays? Do you theme them, have them at a party place or do a down-home thang?